Reverse Optical Engineering is pivotal for recreating or enhancing optical components, especially when original designs are unavailable or are in need of improvement.
This case study showcases the necessary steps in lens reverse engineering, from customer collaboration and sample testing to optical path simulation and final lens assembly.
Using advanced tools and iterative optimization, tailored solutions meet precise specifications, ensuring customer satisfaction and industry innovation.
The value of reverse engineering extends to revitalizing legacy products and staying abreast of evolving optical industry demands, highlighting its crucial role in technological advancement and customer-centric design.
Introduction to Lens Reverse Engineering Case Study
Reverse optical engineering, including lens reverse engineering, entails comprehending the functionality of existing optical components or systems through examination. This facilitates the replication or enhancement of these components. It proves advantageous when the original design is inaccessible or when there’s a desire to enhance existing technology. This method is invaluable for crafting customized optical systems for specific needs, discerning original engineering endeavors, or replicating intricate designs efficiently and cost-effectively. This approach empowers individuals to refine the focal point of an optical system and capture detailed object information for subsequent analysis and manufacturing using the refined design.
The traditional design workflow is typically “from scratch”. In reverse engineering, you start with an off-the-shelf machine or component and work backwards to disassemble each component or layer. Due to various reasons, the original manufacturer of this lens has stopped production, but there is still a small amount of demand in the market to continue the production of the lens in reverse.
Specification
Diameter
32mm
Focal length
25mm(magnification 10X)
Eye relief
25-250mm
Lens reverse engineering process
Customer needs to provide a sample lens
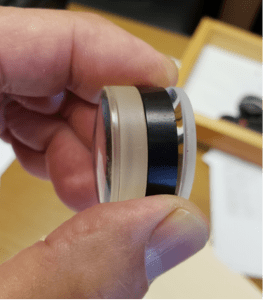
First of all, the customer needs to provide two sample lenses, one for lens image quality testing, and the other for destructive testing of the parameters of the lens and structural components. At the same time, it is also necessary for the customer to provide the use scenario of the lens, so as to pay attention to the customer’s application in the later design. Figure 1 is a customer sample lens.
Figure 1. Customer's sample lens
Design optical path simulation
The customer needed an eyepiece with a lens that could achieve a balance between 25-200mm eye relief distance and imaging using a smartphone, and the customer had to be able to look away from the optics and maintain a good image.
Key parameters are as follows:
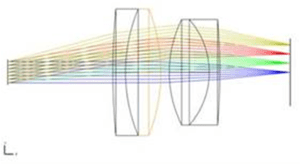
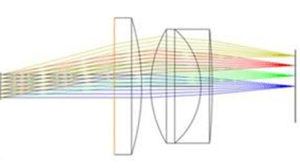
Figure 2. Customer Sample Diagram
Figure 3. Optical Schematic Diagram
Figure 2 and Figure 3 simulate the visual usage of two different lens Settings in existing products. Figure 2 lens does not work for long visual distance, but works well for short visual distance and has high lens resolution. Figure 3 applies to short and long visual distances, but with reduced edge resolution, the distortion is greater when using a smartphone.
Retinal image
Test the overall parameters of the lens
Initially, the primary parameters of the lens undergo testing, encompassing focal length, entrance pupil diameter, back intercept, and image quality. Simultaneously, the lens dimensions are examined, with no alterations made to them during subsequent reverse engineering processes.
Disassemble a lens and input the test lens data into the optical design software, such as Zemax. It is necessary to input the test data into the optical design software. If there is any error, the parameters need to be optimized.
Spec
Radius
Thickness
Material
Diameter
Doublet
50.308
10.488
H-ZK6
32
-22.723
1.477
H-ZF52A
32
-55.444
0.26
32
Singlet
33.006
6.148
H-LAK7A
32
Infinity
32
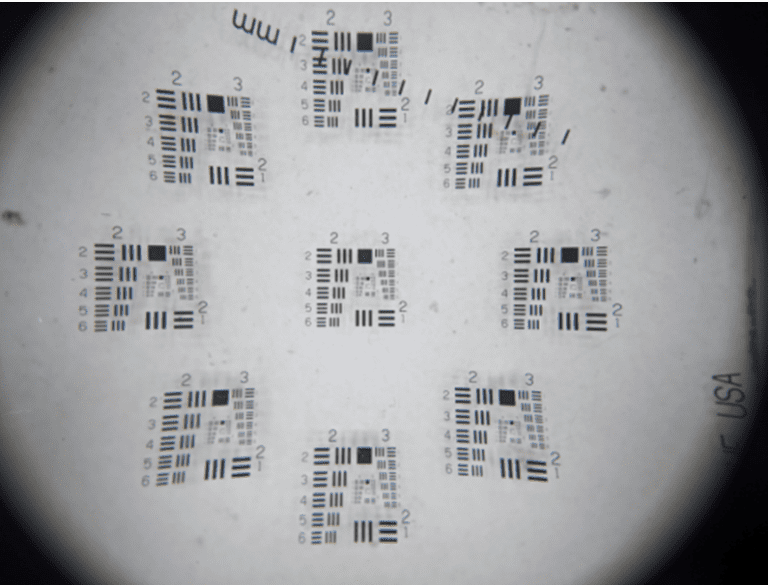
MTF (modulation transfer function) Test Result
Lens overall test results
Shorten the lens focal length to 25mm according to customer requirements, and optimize the lens image quality to meet customer requirements. The test results of the newly processed lens are as follows.
Assembly and take pictures
The actual shot picture is as follows.
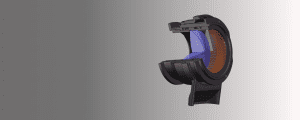
Lens structure
Lens Reverse Engineering Conclusion
The process of lens reverse engineering outlined in this case study demonstrates the meticulous steps involved in recreating optical components to meet specific requirements. By combining customer samples, rigorous testing, and advanced design software, we can craft unique solutions even without the original blueprint.
Throughout the journey, collaboration with the customer remains paramount. Their input and feedback guide the design process, ensuring that the final product aligns with their needs and expectations. Additionally, iterative testing and optimization guarantee that the lens meets the desired specifications, such as focal length, image quality, and eye relief distance.
Ultimately, this case study exemplifies the value of reverse engineering in revitalizing discontinued products or enhancing existing technology. By leveraging reverse engineering techniques, manufacturers can breathe new life into legacy products and consistently address evolving customer demands in the optical industry.