Transmission Spheres
Introduction to Transmission Spheres
In the world of optical metrology, precision is paramount. When it comes to measuring the surface quality and wavefront of optical components, such as concave or convex surfaces, the role of transmission spheres is crucial. These spheres are precision instruments designed for interferometric testing and are indispensable in ensuring optical components meet the highest quality standards.
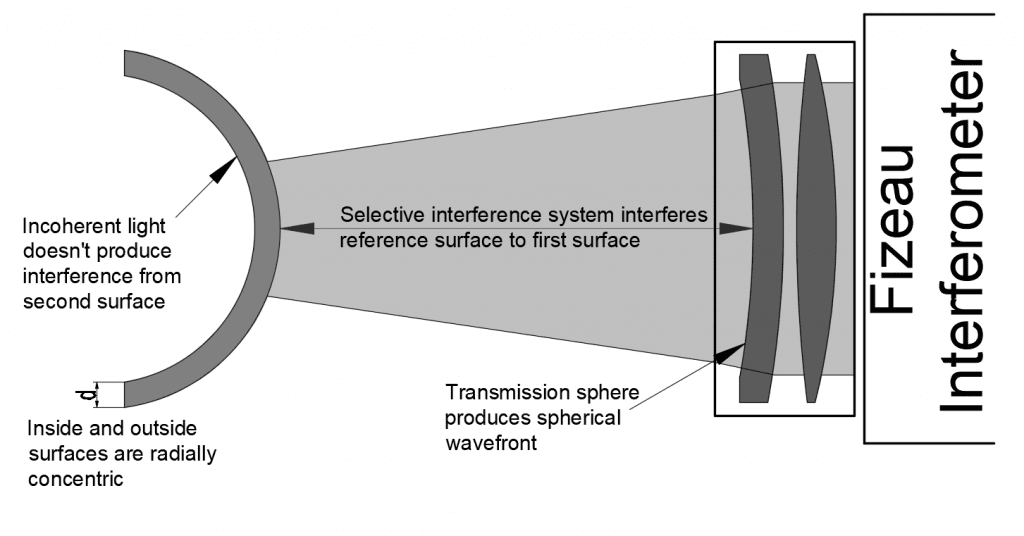
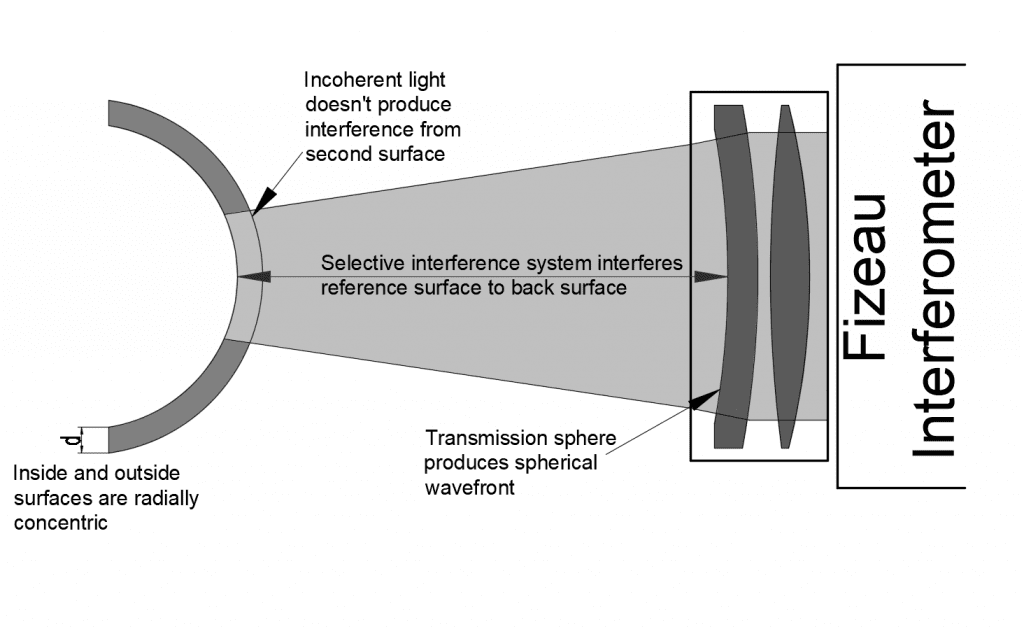
Interferometric testing necessitates the use of two matched optics: the optic under test and a reference optic. When spherical optics are the subject of scrutiny, the reference optic is a spherical surface that closely mirrors the curvature of the optic under test. This reference surface, in conjunction with the optic under test, is housed within a specialized structure known as a transmission sphere, often abbreviated as a “t-sphere” or “TS.”
The Essence of Surface Testing
The primary purpose of transmission spheres is to evaluate the surface quality and wavefront characteristics of optical components, particularly those with curved geometries. These components can be either concave or convex, and transmission spheres provide a means to examine their surface figure and irregularities with unparalleled accuracy.
In the context of measurement, the optic under test is positioned within the transmission sphere, precisely aligned so that its center of curvature coincides with the focal point of the transmission sphere. This arrangement is essential for obtaining accurate results, as any deviation from this alignment can introduce errors into the measurement.


Transmission Sphere Constraints
Transmission spheres must adhere to stringent standards to ensure the accuracy and reliability of measurements. The reference surface within the transmission sphere must be of exceptionally high quality, with minimal imperfections, to serve as a reliable baseline for testing. Any deviations in the reference surface will be reflected in the measurements of the optic under test, potentially leading to inaccuracies.
The Methodology of Measurement
The measurement process within a transmission sphere relies on the principles of interferometry. Interferometers, which are highly precise optical instruments, detect variations in the optical path length caused by surface irregularities. These variations are converted into interference patterns, from which valuable information about the optic’s surface quality and wavefront can be derived.
When the optic under test is positioned to coincide with the focal point of the transmission sphere, light from a source is directed toward both the optic under test and the reference surface. The light beams interfere, and the resulting interference pattern provides data on the quality of the optic’s surface and wavefront.

Exploring the Standard Series
In the world of transmission spheres, there are various series and models available, each designed to cater to specific testing requirements. The Standard Series of transmission spheres offers a range of options for testing a wide variety of optical components. These spheres are well-suited for measuring surface figure and wavefront quality in standard optical components.
In conclusion, transmission spheres are indispensable tools in the field of optical metrology. They facilitate the measurement of surface quality and wavefront characteristics of optical components with curved geometries. By ensuring that the reference surface within the transmission sphere is of the highest quality and by aligning the optic under test with the sphere’s focal point, accurate and reliable measurements can be obtained. Transmission spheres play a vital role in maintaining the high standards of precision and quality in the world of optics.
GREAT ARTICLE!
Share this article to gain insights from your connections!

